27 September, 2015

Shooting the moon

 Those of you in eastern North America that follow the media have perhaps taken note that today - the 27th of September 2015 - we'll have the very rare treat of a supermoon total eclipse.  A supermoon, aka harvest moon, is a perigee full moon, that, by virtue of being closest to the Earth, appears to us larger than usual. Heh, the celestial body doesn't actually change size, of course.

Not a single stitch of the little lunar observer's clothing was made by me.
Back in 2003 I created this photo-montage of the November 8th lunar eclipse, and it was published by the BBC.  Seriously?  that tickled me more than the publication of all my academic papers put together. 

In anticipation of today's event, hubby and I have been practising photographing the beast these last few days. We use two telescopes: a teeny tiny 260mm one (about the same as a 400 mm telephoto camera lens) for full face pics, and a 6" heavy for close-ups.


I dragged all the digital cameras, new and old, big and small, kicking around our house (stuff accumulates, you know) and tried various approaches.  You can see the moon getting fuller and fuller each day, from the 23rd to the 26th:


The close-ups, though?  You can practically see the Apollo lunar landers. Almost. 

Copernicus and Kepler craters
The giant Tycho crater
These are straight out of the camera, unimproved, unstacked single shots.  Not bad for a pair of backyard rank amateurs.... 

So, what does this have to do with sewing, you might ask?  Lots!  The moon is such a huge part of humanity's culture from the beginnings of time that, well, need I enumerate? Like, just for example, it's the basis of a number of calendars:


a frequent subject in mythology, folklore, and literature:


and in music: 


(if Mr. Beethoven isn't to your liking, have a listen to Debussy or Pink Floyd)

And in sewing?  we find moon buttons: 


moon pillows to sew:

moon quilts to piece:

Described as "phases of the moon", but it sure looks like stages of a solar eclipse to me.

moon pants to sew up: 

and, with Hallowe'en coming, Sailor Moon costumes for all the little darlings in your life!


The full moon is almost upon us...  

16 September, 2015

Layered top knockoff - initial pattern development

Sleeveless tops, anyone?

They're my go-to summertime wear.  I've developed my own top pattern, both with and without a side bust dart, and frequently tinker with it to make the end product more interesting.  Like cutting on the bias, or adding pleats, for example.  I've also experimented with overlapping:


 and layering, here with shoulder pleats:


So when I saw this Vionnet top: 

CD$806 - ouch!
I thought, hmm, that's an interesting variation - and then, could I make it?  Drafting the front panel piece and attaching two of them to an ordinary back pattern piece seems simple enough, right?  It would be, but that's only half the story.  Look at the unusual seaming going on at the back: 

It has really interesting implications for the top's construction. Those shoulder yokes, for example?  I'm guessing they're not just decorative but functional too, that each is a continuous extension of the front panel, with no shoulder seam.  The diagonal seam from the armscye to the waist may also be an extension of the front panel around to the back:  which would imply that there's no side seam either.  Those were the two assumptions I went with.  

I started with a little schematic and sketched the one-shoulder diagonal panel:


Then cut out two of them. Voila! the front:


Starting with the same top schematic I sketched in the back seam lines, straightening the lines of the armscye a little for that futuristic aesthetic:  


The CB seam is useful if a sway back adjustment is desired, which is hinted at in the above layout.

Laying the front and back pieces on top of each other, the pattern pieces do look as they should - a tank top.


But when they're rearranged - combining the upper back shoulder yoke and lower back peplum pieces with the front panel, the pattern pieces look pretty extraordinary: 


Two pieces of each are required for the top; the CB seam would be at right in the above pic.  You wouldn't think you could possibly sew together something so odd and make a little top out of it, would you?  

My first proof of concept pattern pieces looked a little more complex:
Look at that:  I created a monster a rooster!!!  But it was drawn exactly on my TNT tank top, so I thought, OK, let's see how this works... And... it does!


The SA's are unfinished in the above, so it's pretty close round the neck and under the arms, and (thanks to a tiny drafting error on my part) it needs a bit more room round the hips to make those front panels more floaty.  The eagle-eyed amongst you  may notice that the shoulder "straps" are of different widths: I added a sliver of fabric to the left shoulder to round out that odd corner created at the shoulder seam point, where the outside front and back pieces met.  And it's also notable that this design demands a bra with straps that are set closer to centre than what I'm wearing. Peekage is not a look I favour (yuck!), and I wouldn't actually wear this design until I found a suitable undergarment.


The back is very close to the original.  The shoulder yokes could should be decreased in width and shortened vertically, and the diagonal peplum seam raised a bit. One important functional difference is that the original has a CB invisible zipper, but my top doesn't.  When you try to pull it on with both arms, the neckline closes up - a function of those loosely hanging overlapping panels.  So getting into it is a funny sequence: first the right arm, then the head, then the left arm, then you shimmy the whole thing down.  The zipper is truly unnecessary. 

More to come, after I've worked through these revisions. 

12 September, 2015

One seam unisex PJ - with pattern


My guys have few sartorial needs, and I'm very seldom called upon to sew for them.  Here's one pyjama outfit I've made for both of them several times - and once already blogged about, albeit in a very cursory fashion, here.  That was three and a half years ago - indeed time doth fly.   The boy was in dire need of a new one.

I return to this self drafted pattern because it's very simple and makes for very comfortable at home wear with breathability and plenty of coverage.  Depending on the fabric, a pattern like this could serve anyone.  My dimensions, below, are for a medium-large guy, but scale it down only a little and make in cotton eyelet or lace, and the outfit could so easily serve as beach or garden party wear on any one of us gals. 

This outfit uses 3.25 m of fabric, and took an afternoon to make. 

The blouse:


I designed the pattern to take advantage of narrow widths of fabrics such as silks and cotton batiks, or, in this case, African wax print cloth - in each case about 110 cm wide.  The blouse uses the entire width of the fabric, with the selvedges at the sleeve hems.  It's made from just two rectangles of cloth, joined by a single horizontal seam at upper chest level. The shoulder line is a fold of the back piece.  

Blouse pattern pieces. 
Construction is extremely simple:  first, cut out the neckline triangle and bind it; I use an 8 cm wide non-bias strip with no interfacing and 1 cm SA's, so the finished width of this kimono-ish binding is 3 cm.  I then sew together the front and back rectangles of cloth at the horizontal chest seam, matching selvedge edges. To permanently flatten down the SA, I top stitch it.  I then fold the piece together at the shoulder line, pin and draw in the side seam lines,  using a small (13 cm diameter) plate for the underarm curve, and sew them, before cutting the sides, stopping 19 cm from the bottom for the side vents.  To make finishing the vents easier, I serge each SA of the side seams separately. Since the sleeves end on the selvedge, they're hemmed with only a single fold; the bottom hem is doubly folded.   An easy variation on this basic is to  make the front hem 3 or 4 cm shorter than the back. 

The shorts: 

The now sadly worn out green shorts, originally one-seams, were made literally an eyeblink before my son got his pubescent growth spurt. Overnight, they became too tight in the seat. So I grabbed a remnant and added a 6 cm wide side panel to each leg.  Here's how it looked in wear:


I cut the old pair apart and used one side to pattern the new, once again no-side-seam, version: 


You can just barely see the chalked cutting line, with a 1 cm SA all around.  So the wearer can tell front from back, the shorts have a (sewn shut, non-functional) front fly, which is also (barely) visible chalked in at extreme right of the above pic.  You could thus make it a functional fly, but my fellas are adamant that they do NOT want it.  Really, the only important sewing line in this pattern is the inseam, as you want to make sure that the hem-to-crotch lengths (at right and left in the pic) are the same. 


The Boy sure didn't want to be photographed!  I do like this image though, as it shows the blouse side seam curve, and the length of the shorts.  And the great wax print!  I was just tickled when my local Fabricland acquired these wax prints.  I have a love affair of long standing with African cloth, so much so that there's something downright Proustian - as in, A la recherche du temps perdu - in this little project.

Back in my academic days I was the Mr. Spock (scientist in residence) at archaeological digs in northern Ghana.  

That's me at lower left, wearing a Madras check shirt that I did NOT make!
One season, the women of the project, and ours was a gal-dominated project, commissioned the local seamstresses to make us outfits out of local wax print cloth.   As we sojourned in a tiny little village in the Ghanaian boonies where electricity was not widely available, all the sewing was - and, I suspect, still is - done on foot-pedal Singer machines that would count as antiques here.   

Here I am with our dig's employees and a slew of local kids, in my two-piece wax print dress.  We called our compound - built from scratch by the project on an empty piece of land just outside the village - Canada House. It included a one room hut for each of the project's members; mine is at extreme left here, with the red window frame.  Inside, there was just enough room for a mattress on the floor with mosquito netting tucked around its edges, a tiny stool, and a bit of dung-smoothed floor for a suitcase.  We'd spend the long dark tropical evenings playing scrabble by kerosene lamp under a gloriously brilliant Milky Way, fortifying ourselves with G&T's, the best anti-malarial favoured by all visitors to Africa.  It worked:  I didn't get that dreadful parasite even once.  

This gorgeous young man, a Fulani from Nigeria, worked with us at the dig.  


Each year, I brought home some amazing genuine kente cloth. I used the one above - a classic design - as the background for a conference presentations of my results from the dig.  Kente cloth weaving is a fascinating subject best left for another time.

So long, everyone!


09 September, 2015

Lovely, lovely linen jacket


Not a whole lot of sewing has been going on chez Straightjacket recently, but I did make this little jacket early this summer, from fabric I'd had in stash for a year or so - I seem to recall it's from Emma One Sock.  Just fell in love with this colourful print and had to have it!  Whereas in winter I tend to go for quite a subdued look, in summer I love it when my clothes reflect the wondrous riot of colour nature provides us. 

I wanted a little jacket with simple lines that wouldn't cut into the fabric's painterly print too much, so I went trawling through my collection of patterns for something very unstructured. New Look 6619 fits the bill perfectly - it has a side panel instead of side seams, a one piece back, one piece fronts, and - quel horreur! - a one piece sleeve (with a sewn-on cuff).  Normally I prefer to sew a two piece sleeve, but as this sleeve was intended to be a short one, I didn't think it would matter.   


This pattern isn't available at the regular NL outlets any more but you can still find it at the usual other places, and even if not, there are other similarly loose fitting patterns out there....

I made version F, with the low stand-up collar, in which the fronts meet but do not overlap.  My collar falls short of CF by design - and I omitted the extensive topstitching. 

I'd made some unlined linen jackets in recent years, in preparation for my stints in the extreme heat of Afghanistan, and they served me well there, but this one is intended to be worn in the much cooler - and heavily air conditioned!  - spaces of Ottawa.  So I was very pleased upon opening the envelope to learn that this jacket was designed to be lined, and has separate front facing and lining pattern pieces.  Not that the lack of these would have prevent me from lining it - I'd just have drafted these myself from the front pattern piece.  But still.  All to the good. 

To give the jacket's front a little visual interest and make it more functional, I added horizontal double welt pockets:


Front details: 

One single big retro button with self fabric loop....


...and the said double welt pockets:


Side panel: 


 The back, with the floral design in all its uninterrupted glory:  

In my sewing, I always try to improve - which means that from one project to the next there may be new approaches.  This time, I underlined (aka sew-in interfaced) the whole garment, including the sleeves and front facings, with cotton broadcloth.   I wanted more body to the linen, and to give it support that would decrease its notorious tendency to wrinkle the minute you throw it a glance. 

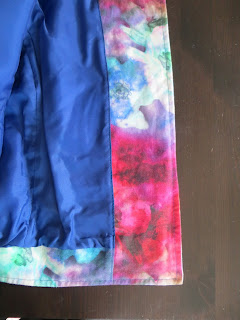
It's lined with bemberg rayon, in a lovely royal blue: 

I first created the entire lining plus front facing plus hem facing (the hem facing was my own alteration of the pattern) as one whole item.  That's how the front facing+hem facing connection came to be so nicely and tidily machine sewed. I then sorta bagged it:  finishing only the neckline and sleeve lining hems by hand.  

I have enough of this lovely linen left for a matching skirt, but I'll wait till next summer to make that.  Why?  well, as the saying goes, sew for the body you have now.  This summer I dropped a few too many pounds, though not intentionally, and I'm hoping that by next warm season the scale will have rebounded at least a tad.  So it would be very foolish of me to sew a skirt now that may not fit me next year.  

In the meantime, the jacket looks pretty nice on top of black & white. :)